
Product photography can be daunting. It doesn't have to be.
Here are a few inexpensive ideas that will help you along the way.
Light
Light sources are important. The best photographer can struggle with daylight. Controlled light is much more... Well, easier to control. Controlled light sources are lights proper, actual lights or aka lamps. I like lights I can count on to be consistent, whereas, sunlight does what it does, throws shadows, and is hard to move around.
Light Bath
One idea is to bathe the subject in light, and also eliminate shadows. Much like how water wraps around the bather in a tub.
I try to have all areas lit with a "light bath" to remove all shadows. I don't want the product floating, so a tiny shadow is fine, but I also don't want shadows to take away from the subject. Shadow elimination is caused by wrap around light. Light wraps around the subject and fills in all dark areas.
Lights that flash or shine directly onto the subject can be harsh, similar to sunlight, however, a light bath can be the thing that takes your photos from just okay to stellar.
These images were photographed a different times. Same light.

White Balance
White balance adjustment is important. White balance is where whites appear white. When we pull away from the image without the knowledge of white perception (what we THINK is white) and use an adjustment we can see what true whites are and therefore how to adjust.
There are many places to read about white balance, but this is truly important to a photo that stands out verses a flat photo that will be passed over.
An image with a color cast, like blue, can dull the image unnecessarily.
This image has had white balance adjustment applied. (My website compresses images so whites are not as true as the background, which is what was created).
Read more about white balance here.
Light Source
If you want to achieve great photos follow those who create great photos. I am always learning and growing with photography, a never ending education.
I love product images that don't have anything in the background but white. This helps me move images around, create composites (no need to retake photo) and utilize images for a variety of applications.
The way I achieve a white background is to shoot (photograph) on a white background with a light bath. I have purchased many light boxes, like the soft material boxes (getting the wrinkles out of the material light box is impossible), full light kits (lots of money sitting unused in my garage) and foam board. Foam board and inexpensive clip on lights have been my best allies.
I've learned less is more. I no longer will purchase promises, but make my own. I have made two light boxes. Although imperfect, they work AND didn't cost a fortune. The best part is, I use them! I use them daily and have relied on my ingenuity far more than a fold up light box that did not serve at all. Not one photo could I use from that box. It was hard to move around and worst, caused me a great deal of work in the editing area.
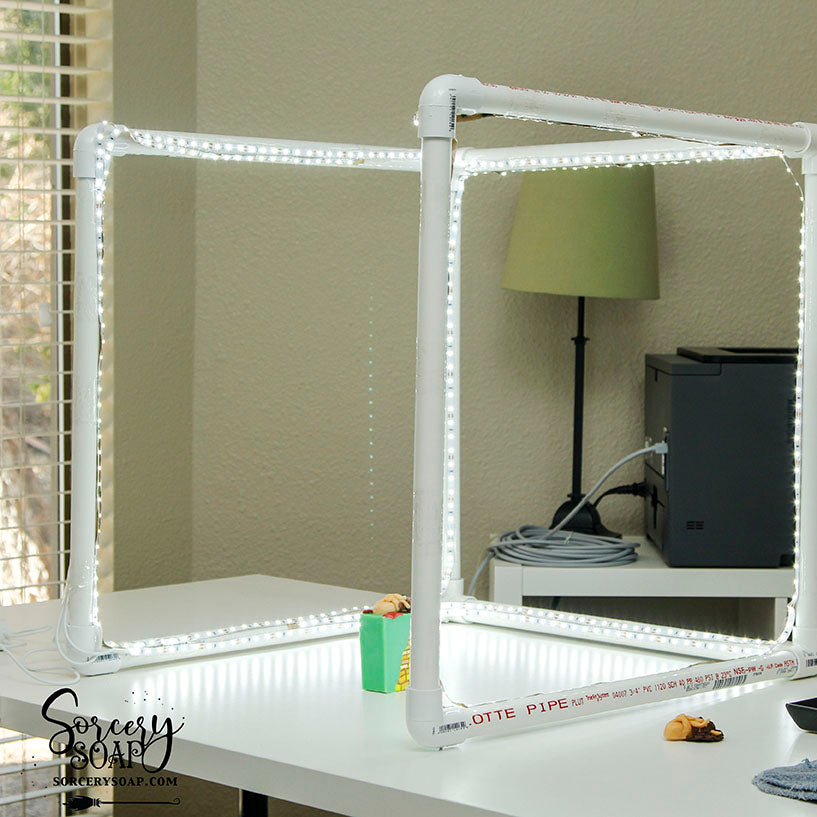
The light box I use for video (see large light box) could use a bit more light, but it was our first prototype light box. It cost about $80. We learned a lot about what we need for product photography and video.
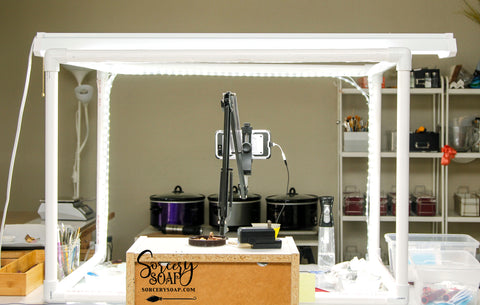
Our second light box we figured out we don't want one as cumbersome to move, and simply do not need such a large area lit for still photography. This one we built 20" x 20" x 20". We also figure out we didn't need the top cross bar, because I bang my head on the video box repeatedly, however, it does light my face up a bit more than without it, so there's that.
This new light box is smaller AND we have smaller led lights this time, with an inline on/off and dimmer switch.
Lessons
Learn from our mistakes:- One big lesson was, do not use double sided tape! It caused a sticky mess on the video light box. We ended up using packing tape to cover up the stickiness left from the double sided tape. Fail.
- Always, always use zip ties to place lights before taping. This saves a headache of pulling everything off and repositioning.
- LED lights will cause a blue cast. This is easily corrected in editing software.
- Always use a level. Even though the exact squareness of the light box is not important, craftsmanship in all endeavors is. Once the PVC glue is set, there is NO changing it.


What you will need
- 32 FT of led lights. These come in 16 or 32 feet lengths. These can be found on Amazon for $27.99. These are the ones we used for our small light box.
- 10 - 20" 3/4" PVC pipe.
- 4 - triple corner
- 4 - right angle corner
- PVC Glue
- PVC cutter (if you don't already have one.) $37.05.
- Grand total: $65.08

I have an even less expensive version here. This is where my lights from that expensive light-kit came in handy.